

This tutorial was written using PSP 10 and for those with working knowledge of PSP. This tutorial was written by me and exclusivly my design. Any tut simliar is pure coincedince.
This tutorial is meant as a guide only, remember creativity in a tutorial is the best part!
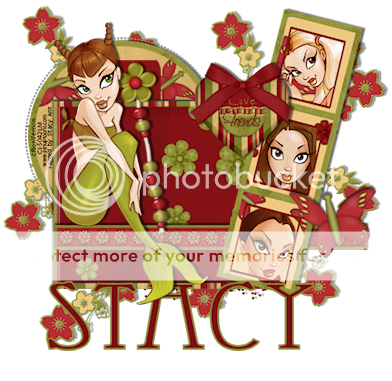
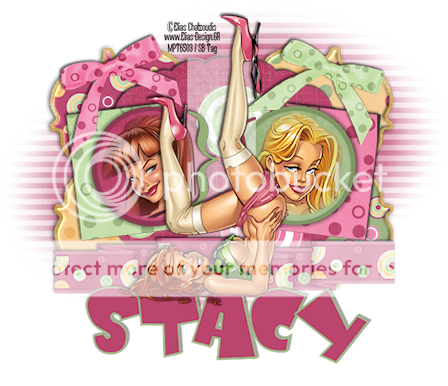
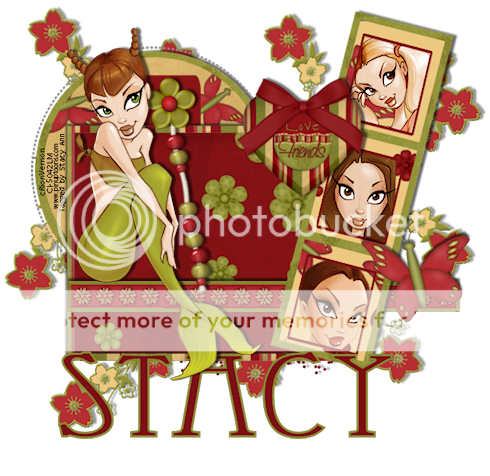
Art work Elias Chatzoudis http://www.elias-design.gr/
You must have a license to use her work
Please visit My PSP tubes to purchase one.
Supplies needed:
Scrapkit are all by the talented Bea at Beas Creation
Template #29 here
ScrapKit: GAB_FFO; Friends Elements and Friends Paper and here
Mask; WSL_Mask 16
Thank you for sharing your wonderful work!
Let's get started
Open up template duplicate close original
Working layer by layer
First you need to move the hearts over to the left hand side, as in my sample above
1st Layer
Rec 3
use your magic want tool to select inside the rectangle
Scrapkit; open PP2 paper resize to 10pixels; copy and paste into template select the rectangle again; Selections >Invert / select paper layer again and hit delete. Selections > None.. Now use your magic wand tool to select the black border around Rec 3 using ##414317 flood fill we need to bevel the border.. use the following settings; Bevel 1 > Width 2 > Smooth 20 > Depth 2 > Ambience 39 > Shininess 0 > Angle 315 > Intensity 35 > Elevation 30 / Selections > select none
2nd Layer
Rec 2
We are going to do everything we did above exept use PP10 from the scrapkit and use #000000 as the border color
Rec 2
We are going to do everything we did above exept use PP10 from the scrapkit and use #000000 as the border color
3rd Layer
Rec 1
Again use everything as Layer 1 except use PP8 from the scrapkit and use #30373d as the border color
Rec 1
Again use everything as Layer 1 except use PP8 from the scrapkit and use #30373d as the border color
Now lets do the background bar layers
Gray bars bg
Now all I did was pull elements resized and dupliated the elments as necessary to make sure they went the full length across the bars
Gray bars bg
Now all I did was pull elements resized and dupliated the elments as necessary to make sure they went the full length across the bars
Top bar:
GAB _ Friends Elements / Rik-Rak2
Resize to 20 pixels / Copy and paste onto template and move right above the top bar. You will need to move to the right just until the end meets the end of the bar and then use your selection tool to cut off the right end. Once you have done this lets colorize. Go to: Adjust > Hue and Saturation > Hue/Saturation/Lightness use these settings; Hue 96 > Sat 25 > Lightness -73
2nd bar:
GAB_Friends Elements / Button Border
Resize to 15 pixels / Copy and paste onto template and move right above the 2nd bar. You will need to duplicate this layer to extended it over the whole length of the bar. Erase any ends you do not need.
Resize to 15 pixels / Copy and paste onto template and move right above the 2nd bar. You will need to duplicate this layer to extended it over the whole length of the bar. Erase any ends you do not need.
3rd bar:
GAB _ Friends Elements / Rick-Racklong
GAB _ Friends Elements / Rick-Racklong
Resize to 20 pixels / Copy and paste onto template and move right above the top bar. You will need to move to the right just until the end meets the end of the bar and then use your selection tool to cut off the right end. Once you have done this lets colorize. Go to: Adjust > Hue and Saturation > Hue/Saturation/Lightness use these settings; Hue 210 > Sat 19 > Lightness -12
4th bar:
GAB _ Friends Elements / Rik-Rak2
Resize to 20 pixels / Copy and paste onto template and move right above the top bar. You will need to move to the right just until the end meets the end of the bar and then use your selection tool to cut off the right end. Once you have done this lets colorize. Go to: Adjust > Hue and Saturation > Hue/Saturation/Lightness use these settings; Hue 32 > Sat 46 > Lightness -73
Resize to 20 pixels / Copy and paste onto template and move right above the top bar. You will need to move to the right just until the end meets the end of the bar and then use your selection tool to cut off the right end. Once you have done this lets colorize. Go to: Adjust > Hue and Saturation > Hue/Saturation/Lightness use these settings; Hue 32 > Sat 46 > Lightness -73
5th bar:
Copy and paste from bar #2 the button layer
6th bar:
Copy and paste from bar #3
we need colorize
Hue 0 > Saturation 69 > Lightness - 15
Copy and paste from bar #3
we need colorize
Hue 0 > Saturation 69 > Lightness - 15
Hearts!
If your hearts are postioned where mine are lets get started
Select the inside of the top heart and delete the inside of the heart. Now select the border of the heart and flood fill with #570d0d. Now select the inside of the heart again Selection > Expand by 2 pixels. Go to PP6 resize to 10 pixels, copy and paste onto template, position over heard, Invert selection, select paper layer, hit delete. Now move this layer below the border outline. If you would like to use the stitching as I did I just used my Heart Preset tool with white stiching and the line should be Line End Gap with width 2. Create your heart and munipulate the heart so it looks like stiching within your heart layer.
CLOSE all layers except the layers associated with the heart then merge these layers visible.
Now copy and paste this layer and move down like mine.
Now open FFO_Fastener
Resize by 10 copy and paste onto template as mine is.
Bow
Open Bow 1 resize to 7 pixels / copy and paste onto template and position on the left Rec to the top.
Open Bow 1 resize to 7 pixels / copy and paste onto template and position on the left Rec to the top.
Clip
open Clip 3
Resize to 20 pixels / copy and paste onto template. NOTICE this part is alittle wierd!!
flip the clip and position so the string looks like it's going between the bow, duplicate this layer and close the bottom one. Now make sure the top layer is selected and erase all of the yarn that goes past the bow also erase the string that goes past your bottom hear layer. OPEN the duplicated layer, flip again and free rotate by 20 to the right, position so top yarn layer and this layer looks like it's a continuous piece of yarn and erase any yarn you do not need. Use my sample as a guidline.
Last but not least your Tube
Open your tube image copy and past it onto the template. place tube over Rec1 and erase the bottom half of the tube so it looks like she is standing inside the rec. Now duplicate layer, erase everything but the VoDoo doll and position the voodoo doll in Rec2 and lower the opacity so it looks more like a mirror image or reflection.
WORDS
On the top you will see the word art "Im crazy for you" move this up and make your own wording like mine "But don't cross me!"
Mask Layer
You will do this twice and position on to the top right and one to the bottom left. So pick any colors you would like touse and create to mask layers.
Once you have finished this you should be done!! Remember to watermark and copyright all your work!
Huggers
Stacy