
This tutorial was written using PSP 10 and for those with working knowledge of PSP. This tutorial was written by me and exclusivly my design. Any tut simliar is pure coincedince.
This tutorial is meant as a guide only, remember creativity in a tutorial is the best part!
Art work Rion Vernon http://www.pinuptoons.com/
You must have a license to use his work Please visit the CILM to purchase one.
Supplies needed:
Template and Scrapkit are all by the talented Bea at Beas Creation
Template #12 here
ScrapKit: Family here
Thank you for sharing your wonderful work!
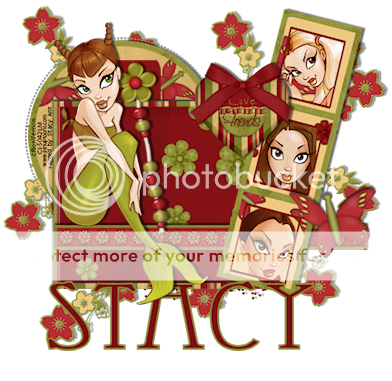
Let's get started
Open up the template, duplicate, close original
We will be working layer by layer
Layer 1
Close all layers except for Kreis layer / Selections > Float
Open up paper #5 copy and paste into template. Reduce size to 50% move paper so it's over your selected circle / Selections > invert / select paper layer and hit delete. KEEP floating ants but go back to Selection > invert > Selections > Modify by: 16
Open up paper #7 copy and paste into template. Reduce size by 50% and move paper over selection and make it so there are pretty butterflies showing. Selections > Invert / select paper hit delete / select none
Layer 2:
Rahmen Rechteck
Selections > Float
Open Paper #4 copy and paste into template reduce size to 70% / Selection > Invert select/ select paper layer and hit delete.
Layer 3
Rechteck
Selections > Float
Open Paper #12.. such pretty paper :) copy and paste into template resize paper by 50%. Now we are going to have to stretch the paper to make it fit in the window; use my siggy as a sample.
Layer 4
Rahmen Dia
Selections > Float
Open Paper #5 copy and paste into template reduce by 85% / Selections > Invert / Select the paper layer and hit delete. ** just so you know that some of the paper is probably hiding on the top and bottom that was not able to delete. You may want to erase these bits to avoid wierd drop shadow effects.
Layer 5
Dia
Selections > Float
Open Paper #7 Copy and Paste into template reduce by 70% / Selections > Invert / Select the paper layer and hit delete.
In this next part it's totally optional but if you look at my example above you will see extra windows in the Dia area.. you can either make these or skip this part. I just made a rectangle line 3 points using #791113 then rotated to the right by 15 pts coping and pasting 2 more times. I then clicked inside the squares with my magic wand tool and added my other Rion characters.
Layer 5
Bloom layer
Close this layer we will not use it. Instead go to the Elements folder of your scrapkit and grab the family heart 1. I added the word Friend to my heart. Once done copy and paste into your template. Resize heart by 40% and position where the bloom was.
Layer 6
Abger, Rechteck
Selections > Float
Flood fill with #791113
Go back to your scrapkit elements folder and open Flower #7 copy and paste into template / resize by 30% and move to the top of the Abger, Rechteck layer
Now open the Bead Element / Copy and Paste into the template / Resize by 60% / Rotate to the left by 15% and move down below the Flower #7 layer
Go to the Ribbon folder in your scrapkit and open Ribbon #2 / copy and paste into template / Resize by 80%. Go back and open up Ribbon #4 / copy and paste into template / resize by 70% and move above Ribbon #2. You will see it's too short so you need to duplicate this layer and make the ribbon longer then erase on the end to make it match the green ribbon. Both of these layers need to be moved below the Dia layer.
Open up element Butterfly 1 / copy and paste into template / Resize by 40% / mirror image and move to the end of the ribbons like in my sample.
Open up element Family Deko / copy and paste into template and move as the bottom layer. I copied this layer twice and had to do some moving around to get it how I wanted it. You will need to do the same by flipping, mirror.. erasing some sections. Just play with it til you like it.
Last... add your tube top the top.
You will need to add drop shadows as well. I used V=3 H = -3 O = 48 B = 2 Color =Black
Remember to watermark your work and to put all your copyright info and your done!
Huggers
Stacy
No comments:
Post a Comment